Managing Placement Constraints
One of the strengths to DC/OS is its ability to place services on Agent nodes based on Cluster Placement rules or agent resource availability. The first step is to define agent attributes specifying for example where which VM Host or Rack the Agent node is placed and whether the agent node has any special resources such as GPUs for example. As part of this example let's assume that you have 6 agents assigned to your cluster on 2 Racks (we would follow the same example if the agents were assigned to a specific VM Host) based on the table below:
| IP Address for Agent (replace with your agent node IP list) | Rack Id | GPU |
|---|---|---|
| 10.0.2.99 | A1 | False |
| 10.0.6.130 | A1 | False |
| 10.0.0.95 | A1 | True |
| 10.0.2.26 | B2 | False |
| 10.0.3.64 | B2 | False |
| 10.0.0.217 | B2 | True |
Setting the DC/OS Agent Node Attributes
To enable DC/OS and Apache Mesos to properly manage the cluster based on the above definitions (by the way, we can assign any sort of attribute to our agent nodes, the above represents just one of the most common), we will need to define the attributes for each of the 7 agents and then restart the agent service as described in the steps below for each of the agent nodes:
- SSH into the agent node using the DC/OS command Line
dcos node ssh --master-proxy --private-ip={IP Address from table above}
~/dcos_sdk/dcos-commons/frameworks/kafka >dcos node ssh --master-proxy --private-ip=10.0.2.99
Running ssh -A -t [email protected] ssh -A -t [email protected] cd /var/
Last login: Mon Nov 27 00:11:50 UTC 2017 from 10.0.4.167 on pts/0
Container Linux by CoreOS stable (1235.12.0)
Update Strategy: No Reboots
Failed Units: 2
  format-var-lib-ephemeral.service
  update-engine.service
core@ip-10-0-2-99 ~ $
enter into the /var/lib/dcosdirectory and create the attribute file mesos-slave-common
cd /var/lib/dcos
vi mesos-slave-common
Add attributes to the file with the following pattern:
MESOS_ATTRIBUTES=key:value;You can define as many attributes as you would like so long as each key:value pair is separated with ';' character. So for example for the first node in our table, we would assign as follows to the MESOS_ATTRIBUTES property:
MESOS_ATTRIBUTES=rack:A1;GPU:False;Now that the MESOS_ATTRIBUTES are defined it is necessary to remove the current Mesos attribute file then restart and validate the dcos-mesos-slave service with the following commands for the private-agent nodes:
sudo rm -f /var/lib/mesos/slave/meta/slaves/latest
sudo systemctl restart dcos-mesos-slave.service
sudo systemctl status dcos-mesos-slave.service
For the public-agent-nodes you will follow the commands below:
sudo rm -f /var/lib/mesos/slave/meta/slaves/latest
sudo systemctl restart dcos-mesos-slave-public.service
sudo systemctl status dcos-mesos-slave-public.service
Deleting the metata/slaves/latest file forces Mesos to reset the node attributes based on the current mesos-slave-common definition, even after the cluster has been installed. That stated it is recommended to perform the
systemctl restart dcos-mesos-slave.serviceon a select group of nodes at one time to ensure sufficient resources exist to keep the active services and tasks running. In other words, DON'T RESTART ALL THE AGENT NODES AT ONE TIME. Also, it is important toWhen the service restarted then you will see the Systemctl status below:
sudo systemctl status dcos-mesos-slave.service

dcos-mesos-slave.service - Mesos Agent: distributed systems kernel agent
Loaded: loaded (/opt/mesosphere/packages/mesos--b561eb0a7d13cda8a36d4fc014e35aefe97b24d9/dcos.target.wants_slave/dcos-mesos-slave.service; enabled; vendor preset: disabled)
Active: active (running) since Mon 2017-11-27 01:04:15 UTC; 3s ago
Process: 20094 ExecStartPre=/bin/bash -c for i in /proc/sys/net/ipv4/conf/*/rp_filter; do echo 2 > $i; echo -n "$i: "; cat $i; done (code=exited, status=0/SUCCESS)
Process: 20091 ExecStartPre=/opt/mesosphere/bin/make_disk_resources.py /var/lib/dcos/mesos-resources (code=exited, status=0/SUCCESS)
Process: 20072 ExecStartPre=/opt/mesosphere/bin/bootstrap dcos-mesos-slave (code=exited, status=0/SUCCESS)
Process: 20064 ExecStartPre=/bin/ping -c1 ready.spartan (code=exited, status=0/SUCCESS)
Main PID: 20108 (mesos-agent)
 Tasks: 15
Memory: 3.3M
   CPU: 514ms
CGroup: /system.slice/dcos-mesos-slave.service
        └─20108 /opt/mesosphere/packages/mesos--b561eb0a7d13cda8a36d4fc014e35aefe97b24d9/bin/mesos-agent
Now that the dcos-mesos-slave service has restarted, go into the DC/OS GUI Nodes screen first to confirm that the just now changed Agent node is healthy. If the recently changed nodes have some form of error indicator beside them or if the HEALTH is 'unhealthy', then double check your typing in the mesos-slave-common file for typos.
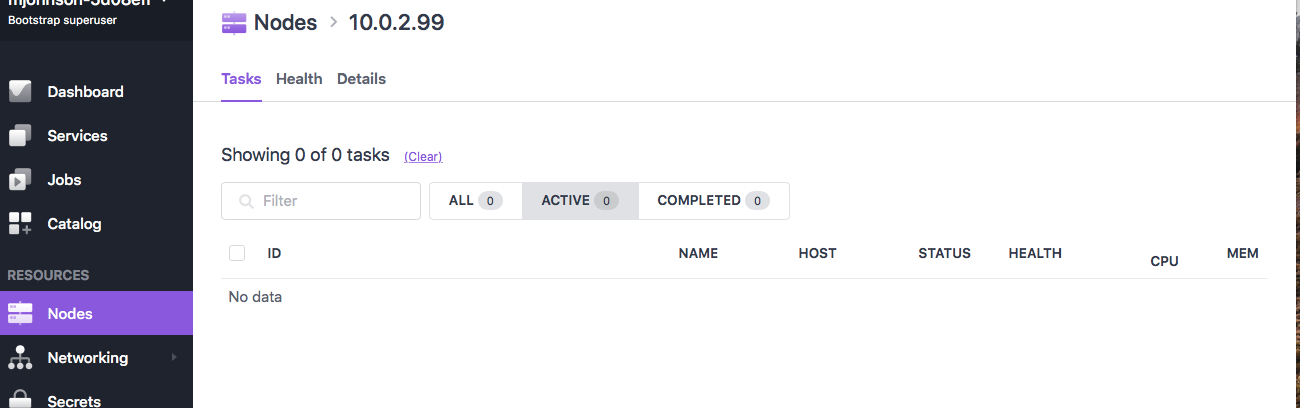
As we see the first node we modified is in fact healthy per the screen capture above, we are now ready to click on the node we just changed ('10.0.2.99').
Then click on the 'Details' link at the top of the page so we can confirm that our two new Node level attributes are defined as expected.
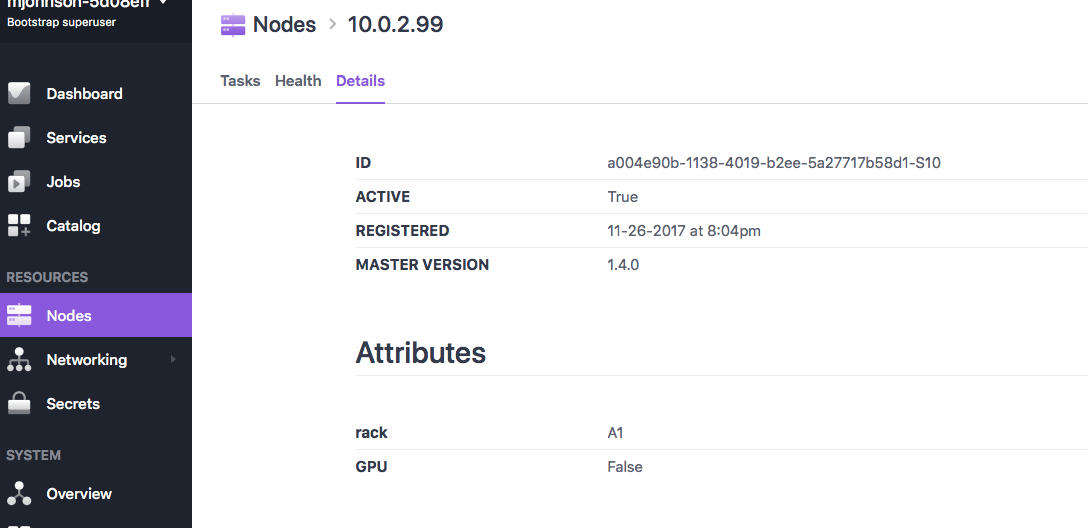
Here we see that the rack is correctly set ton "A1" and we are saying there are no GPUs available on this node. You can now repeat these 5 steps for each of the agent nodes to complete the example.
Defining Placement Constraints to leverage the Agent Node Attributes
To continue our example, let's define two services:
- rack-service: Which can only get placed on a Unique Rack. So in our example, scaling to 2 would result in one of these services placed on the A1 rack and the other on the B2 rack.
- rack-b2-gpu-service: Which can only get placed on a DC/OS agent node where the 'rack' attribute is equal to the value 'B2' and also has a GPU resource.
Before proceeding, please make certain you have defined the attributes as specified in the agent node definition table found at the top of the table. If do not have all of the nodes defined with the attributes used for the placement constraint, then you will see your service waiting forever for a resource as shown in the image below:
To specify our Placement Constraint for the first service, lets execute the following steps:
Go into the 'Services' screen and add a 'single container' service, giving it the name 'rack-a1-service', Then click on 'MORE SETTINGS' to expose the 'Placement Constraints' screen

Click on 'ADD PLACEMENT CONSTRAINTS', then enter the placement rule as shown below:
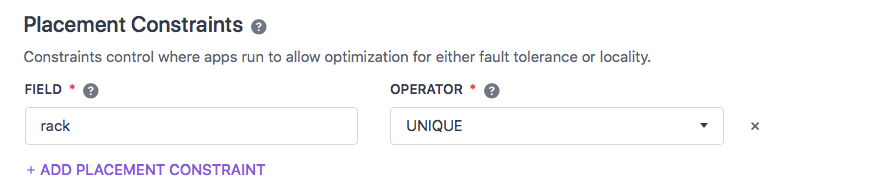
For our first service we just want to reference the attribute 'rack' which was defined earlier in this article. The beauty of the placement constraint implementation is we can use any combination of DC/OS agent attributes already defined to the cluster. Once we have entered the placement constraint as specified above and have the service the way we would like it, then just click 'Review & Run' followed by 'RUN SERVICE'.
Looking at the instance definition for our new "rack-service" we see that it has deployed to whatever nodes is available, which frankly is not that interesting. However, by increasing the scale to 2 should see one of the services allocated to the nodes with the 'rack' attribute equal to "A1" and the other where it is equal to "B2".
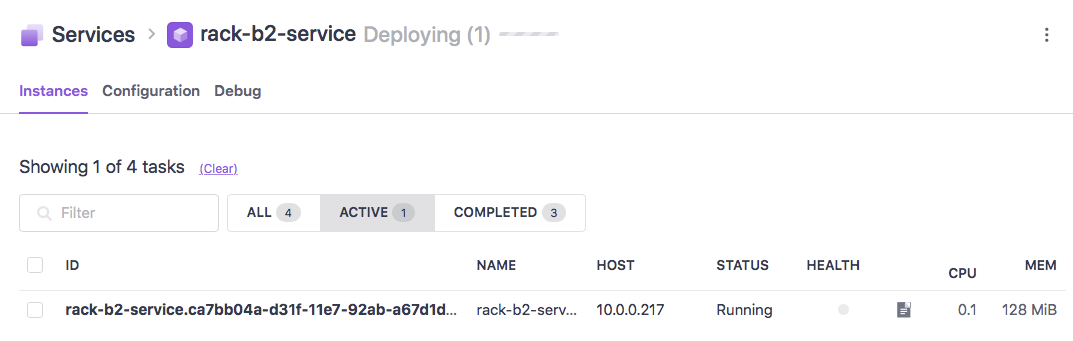
 Ok, Now lets look at our second more complex example which has 2 Placement constraints. For this example, we are going to follow the same basic steps as for our earlier example, except that we will have two rules for our placement constraints; rack=B2 and GPU=True as shown below:

Once we restart the service with the above placement constraint we should end up being deployed to the 10.0.0.217 node which is on the B2 rack and has GPUs.